Monday, April 29, 2013

Simple Pancakes and Sinfully Easy Strawberry Syrup


Pancakes are one of those things that are ridiculously easy to make, but seem like they'd be a pain without one of those just-add-water mixes. Even though making them from scratch only involves a few ingredients, the thought of all that measuring first thing in the morning tires me out. What can I say? I'm just not a morning person.

Basic ingredients
Luckily, I found a recipe for a good pancake mix (along with several others). One batch of the mix makes enough for around five batches of pancakes. I can make the mix whenever I want and then just add the wet ingredients and have pancakes in the morning. That's an acceptable level of effort for me.


What? It fits..
I usually make a double batch of the mix; that's as much as the biggest bowl I own will hold. Actually, it's a little more than the bowl will hold, so I make a bit of a mess as I mix it all up. However, the end result is
enough mix for 10-11 batches of pancakes, so I don't have to make it all that often.

After I had made it a couple times – and had to look up the recipe each time – I got smart, and just wrote it down and taped it to the container. This also helps prevent me from thinking it's just regular flour and trying to make bread out of it...which has almost happened a couple of times.
This level of mess is not unusual for me
Children walking nearby may get messy as well

These pancakes are one of Zoey's favorite meals, so it made sense to make them for her birthday. I thought I'd get fancy and make them in shapes, using cookie cutters. That was a Bad Plan. It probably would have worked okay if I had chosen simpler shapes and thought to spray the cutters. However, it was morning so I did neither. A couple problems arose. First, because the batter couldn't spread out, it went up, making the world's thickest pancakes. I could adjust for that, however, and the pancakes cooked fine. Unfortunately, I had to mangle them to get them out of the cutters.
It started well...

What? It's OBVIOUSLY a stegosaurus...
Lesson learned; pancakes should be round unless made by someone with the talent to free-hand shapes. In case there was any doubt, I am not that person. It doesn't really matter, since both of my kids get their pancakes cut up before eating them anyway, but I feel like they should at least know the pancakes were cool at one point.


To compensate for the lack of neat pancakes, I made some strawberry syrup to go on top of the boring rounds.

The syrup was really easy to make – equal parts sugar and water, and about twice that in strawberries. I think. I didn't really measure the berries, just threw them in. They were frozen and stuck together, so measuring would have been a pain in the rear, and it was still morning.
Sugar.  With water.  MIB style

Since I used frozen berries, I didn't worry about chopping them up since I knew they'd get mushy when they thawed anyway (yay for less effort!). If it was later in the year, and local berries were ripe (curse you, people that live in areas that already have ripe strawberries...I'm looking at you, Californians!) I would probably cut them in half and/or mash them up a bit before adding them to the sugar and water.
And some berries

As is, however, I just dissolved the sugar in the water, added the berries, and stirred every once in a while as I made the pancakes. The berries were so soft, that I just had to mush them a little with the spoon to get them to fall apart fully. By the time the pancakes were done, so was the syrup. The recipe made a lot, so I have a pint jar of deliciousness left in the fridge; we didn't exactly go light on it, either! I'm sure Zoey will take care of that in short order. Unless Randy beats her to it, that is.
Who needs pancakes?  Just eat the syrup!


RECIPES:

PANCAKE MIX:
6 c all-purpose flour
2 c whole wheat flour
2 c powdered milk
½ c sugar
3 T baking powder
1 ½ T salt

Mix all ingredients together. And store.

PANCAKE RECIPE:
Makes approximately eight 6-inch pancakes.
2 c pancake mix
1 ½ c water
2 T oil
1 egg

Pour pancakes onto a hot skillet. Cook until bubbles form and pop. Flip. Cook until pancakes puff slightly and steam.

STRAWBERRY SYRUP RECIPE
1 c water
1 c sugar
2 c strawberries (10-15 large berries)

Create a simple syrup by combining the water and sugar in a medium saucepan. Heat over medium-high heat (between 6 and 7 on my dial) until all the sugar is dissolved and the liquid is clear.

If working with fresh berries, quarter the berries and mash them slightly with a fork or the back of a spoon. Frozen berries can be added whole.

Add the berries to the simple syrup and heat to a boil, stirring occasionally, and breaking up large clumps with the spoon.

Boil for 3-5 minutes, stirring frequently to prevent scorching. Remove pan from heat, and allow to cool and thicken for 5-10 minutes.


Tuesday, April 23, 2013

Simple, Wonderful, Sprouts (Brussels, that is)


My obsession with brussels sprouts started just about three years ago – shortly after Zoey was born. Before then, the fell into the category of “vegetable that I don't know much about” along with “what's with the spelling” and “things a lot of people hate for some reason”. Basically, I never ate them, but didn't have any reason why.
Delicious mini-cabbages!

Then, when Zoey was three weeks old, we went on a road trip. The main purpose was to surprise Randy's parents, which we did. However, we also visited my friends Lisa and Erik in San Francisco. They had also just had a baby, so we wanted to catch up and exchange oohs and ahs. On that visit, Erik made grilled Brussels sprouts and changed my world for the better.

Brussels sprouts have the advantage of being related to cabbage. I know that for many people, this isn't exactly a selling point, but since I only shop once a month, I adore vegetables that stay fresh a long time in the fridge. Cabbage relatives top the list. After I've eaten the salad greens, tomatoes (technically a fruit, but who cares), the summer squashes, beans, and peas, I come to the cabbage-types – broccoli, cauliflower, and brussels sprouts.
All cut up and severed-finger free

I always buy a huge bag of brussels sprouts because I know that no matter how many I get, we'll eat them all and go looking for more. They are that good.

They are also ridiculously easy to make. I don't care how bad of a cook someone is, these are within their grasp. The only danger is possibly cutting a finger instead of a sprout. However, I'm pretty accident prone and I've avoided it thus far, so I'm guessing the average person is more than safe.

Once you have trimmed the stem end off the brussels sprouts and cut them in half, you get to have some fun. Dump then into a gallon ziploc bag (or back in the bag you bought them in, if you used them all. Pour in some olive oil, salt, and pepper and then shake it all up.

Coated and ready
I love this method because it doesn't require me to dirty a dish or get my hands funky mixing it all up. I know what you're thinking...why do you have to use hands? That's what spoons are for! That's because you've never seen the disaster zone I can make with awkwardly sized food and a spoon. Bags are just better all around. Another benefit is that excess oil and seasonings stick to the side of the bag rather than the food, which helps fool-proof these.

After that, it's just a matter of tossing them on a broiler pan and broiling them for four minutes/side or so. Erik the Skilled made them on his barbecue. I am less talented, and also like to eat them year-round, which
precludes using the barbecue. My broiler is a good substitute.

Almost good enough to eat raw
Usually, I eat a good half-dozen before I get dinner dished up. While it's hard to call it the best part, since it's all good, I especially enjoy the single leaves that have fallen off – they are crispy and salty and wonderful in every way. I could eat them all day.


I dare you to eat these and not love them.  They are irresistible.

That's it! It's a nice, simple recipe that makes life better for all involved.

RECIPE
1 lb brussels sprouts
1 T olive oil
1 ½ t salt (or to taste)
1 t pepper (or to taste).

Trim the hard end of the stems, then cut each sprout in half lengthwise
Put in a bag with oil, salt, and pepper, and shake until evenly coated.
Place the top rack of the oven 6” under the broiler (second highest setting)
Broil sprouts for 3-4 minutes, flip, and broil for 3-4 additional minutes or until tender.

Wednesday, April 17, 2013

Pitas: Not Such a Pain After All

I have an addiction to pitas. I love that you can use them as a pocket (fun!), a thick tortilla, funny shaped bread, a utensil to shovel humus down your gullet, or even a pizza crust. Basically, they work for whatever I need at the moment, which lets me be an awful lot lazier about what I'm going to make on any given day. Anything that lets me be lazy is tops in my book!
"Failed" pitas? I don't believe they exist

As with most things, it took a few trials for me to feel comfortable making pitas. Since it seemed so complicated, the period between trials consisted of several years...as in I moved multiple times between attempts. I was sure there was a reason that the internet abbreviation for pain in the ass is PITA. I was, happily, wrong about that.

Really, you only need two things – a flat cooking surface (cast iron griddle or pizza stone) and a hot oven. That's the big secret. Not too much to it, really. I had the hot oven, but not the griddle. I had read you could use a heat-proof frying pan or a cookie sheet turned upside down, but neither worked well for me. I had resigned myself to not making pitas...not really much of a loss, I thought. Then came my mom's birthday; we threw her a Greek-food themed party, mostly so she could eat lamb. She loves lamb, but my dad loathes it, so it's a rare treat for her.

All it needs is a little hummus.  Or a lot of hummus.
I couldn't go Greek without hummus and pitas, though, so I had to acquire a griddle. My first attempt was to
just ask my mom to use hers – she has owned a big cast-iron griddle for as long as I can remember. In my mind it will always be the Pancake Griddle (yes, in capital letters). Unfortunately, she forgot to bring it with her the one time we met up before her birthday, so she bought me one of my own as an early birthday present. I love it. It cooks all my tortillas and flatbreads and is one of the most wonderful things in the world.

I found a recipe on The Fresh Loaf, which I find is one of the more reliable places for all things bread related. Those people are serious about their breads, let me tell you! It is quite easy – only six ingredients, which I appreciate, and just under three hours start to finish.

They can rest now, while you sip wine
They start the same way most breads start – activating the yeast, then mixing in the other ingredients and kneading. As usual, I use my Kitchen Aid* to do this, so I don't have to put in any more effort than adding flour here and there to prevent sticking. I usually have to add quite a bit at this point, because the recipe I use calls to add more water if the flour isn't absorbing; I don't like adding liquid late in the game, because it always seems to make a mess. I just start with the larger amount and add as much more flour as it needs. Once the dough is a good form, knead it for 10 minutes. It seems like a long time to knead it, but hey – after it's done, you get to walk away for 90 minutes or so while it rises!

Once it's risen, put the griddle in the oven on the middle rack (make sure the other rack is below that) set the oven to pre-heat to 420 degrees, then punch the dough down, divide it up into 8-12 pieces, depending on how large of pitas you want, and then walk away for another 20 minutes to let the gluten relax. I suggest having a glass of wine and relaxing on your glutes as well. Symmetry is key.

This is a large pita
Once your wine, er, dough is done resting, comes the labor-intensive part. Sprinkle a little flour on the counter and roll the dough out to 1/8”-1/4” thick. Put it on griddle and let it cook for three minutes. If you have a large enough griddle, you can cook two at a time. While you wait, roll out another pita (or two, look through the oven door to see if the pita in the oven is puffing as it should – not that you can do anything about it if it's not – and sip some wine while you wait for the timer. Repeat until all pitas are cooked.

If the pitas aren't puffing, it's usually one of two things – they were rolled to thick or the oven isn't hot enough. I get about an 80% puff rate. There are always a few that don't work right, but I just use them for non-pocket purposes.
The Perfect Puff

These freeze really well, much better than most breads, in my opinion. That led me to attempt to make a double batch. While the recipe doubled easily, I didn't like how long I had to stand in the oven cooking pitas. I found that a much more effective way was to start a second batch when the first batch finished rising, so I got a nice break from being in the kitchen. And I got boatloads of pitas. Win-win!

RECIPE
3 cups flour*
1 1/2 teaspoons salt
1 Tablespoon sugar or honey
1 packet yeast (or, if from bulk, 2 teaspoons yeast)
1 1/4 to 1 1/2 cups water, roughly at room temperature
2 tablespoons olive oil, vegetable oil, butter, or shortening

*Can be any combination of flours – I use 2 cups all-purpose and 1 cup whole-wheat.

1)If you are using active dry yeast, follow the instructions on the packet to active it (see the note on yeast above). Otherwise, mix the yeast in with the flour, salt, and sugar. Add the olive oil and 1 1/4 cup water and stir together with a wooden spoon. All of the ingredients should form a ball. If some of the flour will not stick to the ball, add more water (I had to add an extra 1/4 cup).

2) Once all of the ingredients form a ball, knead the dough for approximately 10 minutes.

3) When you are done kneading the dough, place it in a bowl that has been lightly coated with oil (I just spray it with cooking spray) Form a ball out of the dough and place it into the bowl, rolling the ball of dough around in the bowl so that it has a light coat of oil on all sides. Cover the bowl with plastic wrap or a damp kitchen towel and set aside to rise until it has doubled in size, approximately 90 minutes.

4) When it has doubled in size, punch the dough down to release some of the trapped gases and divide it into 8-12 pieces.Eight pieces will result in 8”-10” pitas (as pictured above), while 12 will result in 6”-8” pitas.

5) Roll each piece into a ball, cover the balls with a damp kitchen towel, and let them rest for 20 minutes. This step allows the dough to relax so that it'll be easier to shape.

6) While the dough is resting, preheat the oven to 420 degrees. Put the griddle or baking stone in the oven to preheat as well.

7) After the dough has relaxed for 20 minutes, spread a light coating of flour on a work surface and place one of the balls of dough there. Sprinkle a little bit of flour on top of the dough and use a rolling pin or your hands to stretch and flatten the dough. You should be able to roll it out to between 1/8 and 1/4 inch thick. If the dough does not stretch sufficiently you can cover it with the damp towel and let it rest 5 to 10 minutes before trying again.

8) Open the oven and place as many pitas as you can fit on the hot baking surface. They should be baked through and puffy after three minutes.
Repeat until all pitas are cooked.


*Just after Christmas, we found a deal on a more powerful KitchenAid and pounced – it's big and shiny and way more powerful. The kneading hook seems to be much more effective at stretching the dough too. I adore it.
Look how pretty and red and shiny it is!

Saturday, April 13, 2013

Suckered by the Sun

My great grandmother used to say "If there's enough blue in the sky to make a pair of Dutchman's breeches, it'll be nice."  While I'm not sure what percentage of blue sky that is (depends on how much the Dutchman in question eats, I suppose), I do know that Washington has a habit of showing little patches of blue sky that are just big enough to sucker you outside so it can rain on you, especially in the spring.

Won't someone think of the poor, homeless gnomes?
However, in a perfect alignment of the stars, a week of sunny weather coincided with my spring break. Temperatures actually hit the seventies - I had to decide if I should put on sunscreen to protect my pasty white Washingtonian complexion.  Such good fortune meant my whole family spent as much time outside as we could, since it's been raining pretty steadily since, oh, October. It also meant we saw how much work we needed to do to get the garden ready. 

The strawberries needed weeding, as did the garlic bed. The compost desperately needed turning and some direct sun to dry it out. The bean vines that we neglected to pull off the trellis last fall needed removal. The blueberries needed separating and transplanting. Luckily, the prospect of spending time in the sun made all of these tasks downright fun – and that's not a word I use lightly when weeding is involved.

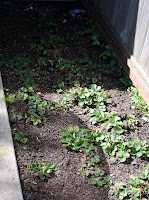
This is a bed of pre-shortcake
Parker mainly ate dirt, while I started with the strawberries – last year, we got five sad strawberry starts from my mom. They got even more pathetic when we left them on our patio table for a few weeks after Parker was born. Once we finally planted them, though, they spread like wildfire. Once I had pulled all the weeds out, I was impressed with how many berry plants we have. By next summer, the bed will be fully filled in – weeds won't even have a chance to get started.

Surprise garlic
The garlic bed was a bit of a surprise – we planted garlic last year, but our cat promptly killed it by sleeping in it. We put rocks in between the garlic plants to discourage him, but he apparently just saw a hot stone massage and kept on sleeping in the garlic. We didn't get much, to say the least. Apparently, though, we missed some when we pulled up what we DID get out of the bed last year, because this year, we have a good half-dozen plants doing quite well. So far, the cat hasn't noticed.

My mom was kind enough to donate some well-composted horse manure again. Somehow, with three horses, she never has a shortage! We got one truckload to top off all the garden beds. Randy dug it all in. Last year, we simply filled the beds with the composted manure and planted in that; we didn't dig up the turf at all. This year, Randy went deeper. It was easy to tell when he hit native soil; the rocks scraping against the shovel made it more than evident. Happily, the beds are crawling with worms of all sizes – I love to see that! It means the soil is healthy and the plants will grow.
Look at those worms - three just in that clump!

We got a few planters from Home Depot for the blueberries – last year, all four plants were in one Rubbermaid tub. We got a few berries anyway (it would have been more, but I showed Zoey what they were and it was Game Over). We also put down a thick layer of manure on the ground under them – we're going to try to transplant some strawberries over here, too, since it's impossible to have too many strawberries.
They're much happier now.

Finally, we got the gutters in the greenhouse filled up. We got the greenhouse from Randy's parents last summer and haven't really used it yet, so it will be quite the exciting endeavor this year. We put three gutters on either side; last fall when we got it set up, we planted a variety of herb seeds and seeds we saved from our garden. Nothing grew. Imagine my surprise when we opened it up to find two pea plants in full bloom! By the end of the week, they even had pods growing on them – peas in April? Inconceivable!

Surprise peas!
Mostly, we plan to use the greenhouse for tomatoes and peppers, which we've never grown. Peppers need warm nights, which don't happen here during the optimal time to plant peppers, so we're going to track how warm the greenhouse stays at night to see if it's feasible...and then try it anyway. Randy discovered a packet of pepper seeds we got with bottles we ordered a couple of years ago when we made hot sauce; he decided to give them a try to see if they'll grow. He soaked the seeds for a few hours and then planted them in a pot in our bedroom (the only room that has a windowsill and no children). Hopefully they grow – and survive transplanting!

Greenhouse gutters - waiting for peppers!
After doing all the prep work, we were almost ready to start planting – the warmth had us convinced that it really is almost summer, and everything would grow just fine. After all, we found peas not only in the greenhouse, but sprouting in one of the garden beds, self-started from dropped seeds last fall. Then Washington remembered what month it is and started to rain and cool off again, putting us back into wait mode. At least now all the prep work is done, so when it warms up for real, we'll be ready to plant immediately.

Saturday, April 6, 2013

Stick O' Butter Sundays

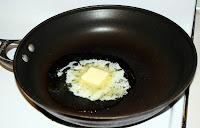
Butter: the new diet food!
 Let's start with the obvious. This is not a healthy recipe. Unless, of course, you count butter as a health food. It is, however, a recipe for the Holy Grail of hashbrowns.

I'm a sucker for restaurant hash-browns – perfectly browned, with each piece of potato distinctly separated from the next. For years, I thought such perfection would always elude me at home. The result of my best efforts at hash-browner-y was gooey, gray, and inconsistently browned. The hash-browns tasted good, especially with hot sauce and ketchup, but fell far short of the utopic dish found at fine dining establishments such as Mr. Bill's and IHOP.


Then, via the magic of Cook's Illustrated, I found them – the perfect hash-browns. Luckily for my waistline, they are fairly time consuming. Unfortunately for said waistline, they are worth it...and since Randy likes them even more than I do, they're hard to pass up on a weekend.

Irresistible fluffy, buttery, perfect hash-browns
Start by peeling four or five medium potatoes. I know most of the nutrition in a potato resides in the skin, but let's face it – health's not a prime consideration when hash-browns are involved. Peeling seems like an extra step, but it helps the texture a lot – when the potatoes cook, the skins separate and create little pockets of dissonance in an otherwise harmonious plate. I resisted peeling for a long time, because the last thing I want in the morning is a breakfast that requires more work than necessary, but after a few trials (and repeated badgering by Randy) I saw the light.

Once you have your potatoes peeled, it's time to grate them. Any grater will work, but I have found that a food processor – or in my case, the grating attachment for my KitchenAid – provides a bit better texture. I don't know why this is – the speed the potatoes are grated at, the relative sharpness of the grating blade (my box grater is at least 15 years old), or pure imagination. Whatever it is, I believe it's better, and since using the KitchenAid is both faster and comes with a 100% less chance of skinning my knuckles, I'm sticking with it.

I used to consider the resulting pile of grated potatoes ready for the pan...and that's why I never got good hash-browns. Apparently, what makes the potatoes glump together is the extra starch on the shreds, mixed with too much moisture. That means there are two more steps to take before the taters can hit the pan.

NOW they're ready for the pan
First, rinse the shreds until the water runs clear. Then, dump the potatoes into a dish towel and wring
as much water out as humanly possible. Do not skimp on this step. The more water you remove here, the better the final product will be. If needed, call in reinforcements when your arms get tired. You'll know you're there when the shreds feel almost dry to the touch and don't cling to each other.

Now grab a stick of butter, take a deep breath and channel your inner Paula Deen. Heat a large saute pan over medium/medium-high heat (6.5 is the magic spot on my dial). Add half a stick of butter to the pan. Yep. Four tablespoons. I know what you're thinking. You're wondering why you only used half. Don't worry – more will come later.

Let the butter melt and brown slightly, then add the potatoes, spreading them out into an even layer. IF you like to season your hash-browns in the pan, salt and pepper them now; I hardly ever remember that part. Let them cook for three minutes, then cover the pan and cook for an additional six minutes.

Now comes the fun part – flipping them. Grab a plate and place it face-down on top of the potatoes. Holding the plate in place with one hand, turn the pan upside down, and lift it. It will come away revealing a beautifully browned plate of wonderfulness. Sadly, they're not done yet.
Step one: Plop down a plate

Step Two: Flip it - don't let go of the plate!

Step Three: Remove pan.


Remember that remaining half stick of butter? Now's when it comes into play. Add two tablespoons of butter* into the pan and let it brown up. Then slide the potatoes off the plate into the pan. Use a spatula to tuck any stray pieces down around the edges, and let cook for another six minutes.
More butter! Yay!

Then sit back and enjoy. When you're done, try to resist the urge to make more. I once made over ten pounds of them. Granted, it was for a crowd, but it was still a wee bit excessive. And worth it.

*I know, I know, there are still two tablespoons left. Usually if I'm making hash-browns, I use the rest of the butter making omelets. At this point, that's the healthy part of the meal!
Best. Breakfast. Ever.

Recipe:
4-5 medium potatoes
6 tablespoons butter
salt/pepper to taste

*Peel and grate the potatoes
*Rinse the grated potatoes under cool water until the water runs clear
*Using a dish towel, wring as much water as possible out of the potatoes. They should feel dry to the touch
*Heat a frying pan over medium-high heat.
*Melt four tablespoons butter in the pan, allowing it to brown slightly.
*Add the potatoes to the pan. Spread them out evenly and let them cook for three minutes
*Cover and cook for six additional minutes.
*Remove lid and invert a plate over the potatoes. Holding the plate against the potatoes with one hand, use the other hand to flip the pan so the hashbrowns are on the plate.
*Return the empty pan to the heat and brown two additional tablespoons of butter in it.
*Slide the hashbrowns from the plate into the pan, browned side up.
*Cook for six minutes, uncovered.